OBS Audio Filter Guide
So you’ve decided to use your mic on your stream! Which would be very helpful toward making the stream more interactive, as generally it’s more fun and joyful watching someone playing games when you can hear what they think via their voice!
But your viewers are supposed to hear your voice and all kind of other noises, and it’s hard to stay in your stream if the noises are too interrupting to watch your stream.
I’m going to explain five audio filters, that will drastically improve your overall audio, and once you’re done setting them up, it will be easier to make changes when someone tells you there’s an issue with your audio.
Before going into detail, I want to tell you that all these filters can be applied to any of your audio sources, not just your microphone. You can use these filters to improve all of your audio sources in the same way we’ll be optimizing your microphone’s output.
Table of Contents
- A quick look at the Peak Meter and the Filter Window.
- Are you streaming in an environment with a lot of ambient noise?
Try the Noise Suppression and the Noise Gate filters. - Is your voice too quiet, even at maximum volume?
Try the Gain filter. - Is your voice too loud some of the time and too quiet at other times?
Try the Compressor filter. - Are you worried about your voice distorting or peaking when you get too excited?
Try the Limiter filter.
About the Interface
Peak Meter
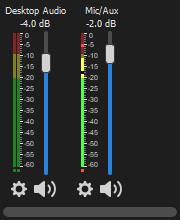
Here each audio channel will display the peak of its signal in real-time. All active filters affect these meters. Here I’ve set them to be vertical, but by default, they’ll be displayed horizontally. There could be more than just two channels if you have more audio devices connected to the computer!
Right-click or click the gear icon to access filters and other options.
Detailed info about how to read this meter is available at the official wiki.
Audio Monitoring
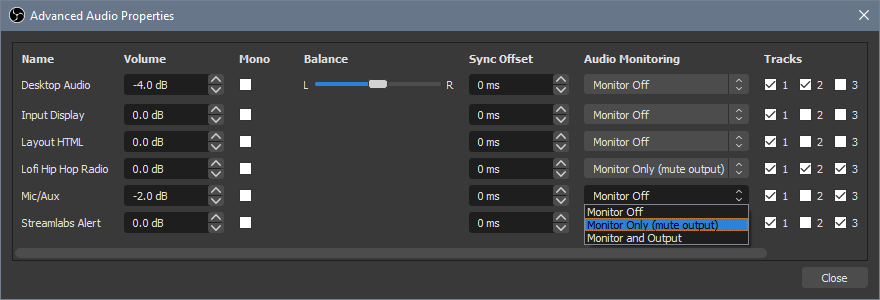
Through the gear icon you can access Audio Advanced Properties. There are more controls on your available channels on current scene here, including Audio Monitoring.
Audio Monitoring control is mainly used for an environment where you have a separate equipment to monitor the audio so we won’t go deep on how to properly set them. Instead, there’s a neat feature I want to point out that we can use without having such equipment:
If you set Audio Monitoring for your mic to ‘Monitor Only (mute output)’, you can directly hear your mic signal through the output device. The signal passed through all active filters, so you can use this to hear the difference while adjusting sliders.
This setting sends the mic signal to Desktop Audio as well, so it’s better to use this only for a testing purpose.
Filter Window

To see all filters applied to a given audio channel, click the corresponding gear icon in the peak meter.
- The eye icon indicates whether a given filter is active. If you’d like to temporarily disable a filter without necessarily removing it forever, you can click the eye to toggle the filter on and off instead of just deleting it or altering its value.
- These icons will let you add new filters, remove filters, and adjust their order. OBS Studio will apply these audio filters to the channel’s signal in order from top to bottom.
It’s worth noting that only the first filter in the order will receive the raw audio input. All the other filters will receive the audio signal after it’s been processed by the filter immediately above.
Noise Suppression

| Problem | My microphone is picking up too much ambient noise. |
|---|---|
| Function | Reduce the audio by the level. |
How to set up Keep yourself silent, start from 0dB and slowly decrease the slider until you see no peak meter movement. Try talking to make sure the microphone is still picking up your voice.
This filter has a very simple interface. There’s one slider named ‘Suppression Level’ and that’s it! It will reduce the associated audio by the amount set by the slider.
Noise Suppression is good at cutting quiet noises like an electric fan in your room.
Since this will reduce the volume of the channel, it’s agood idea to set up a Gain filter to compensate.
Gain

| Problem | I have maxed out the microphone’s volume slider, but my voice is still too quiet. |
|---|---|
| Function | Boosts the channel’s volume. |
How to set up Use the slider to specify how much you’d like to boost the channel’s volume.
This filter has a very simple interface too, and this time the change is instantly visible; the changes you make should be displayed on the peak meter in real time.
Many filters will reduce the overall volume of the audio channel; the gain filter allows you to compensate for this.
Noise Gate

| Problem | I want the mic to be completely silent when I am not talking. Noise Suppression filter isn’t cutting out all of the background noise. |
|---|---|
| Function | Mutes an audio channel until its volume surpasses a given threshold. |
How to set up
- Set the two thresholds all the way to the left, and use the peak meter to monitor the ambient noise your microphone is picking up.
- Move the Close Threshold slider to the right, just past the volume level of your room’s ambient noise. Be sure you aren’t making any extra noise yourself.
- Speak into your microphone and keep an eye on the peak meter to determine an appropriate position for the Open Threshold slider.
It should be to the right of Close Threshold; otherwise, your noise gate may get stuck open.
The Noise Gate filter is intuitive to configure, but not easy to explain in a written form. Here’s a brief drawing to help you understand how it works.

Moving the threshold sliders all the way to the left means the filter will open the channel for signal of any size and close it when it goes into an absolute silent, which won’t likely happen in a general environment. It’s effectively turning off the filter, so you can start setting from there.
This filter’s basic function is to mute or unmute your microphone based on two parameters, the open threshold and the close threshold.
- If the signal is quieter than the Close Threshold, the channel is muted.
- If the signal is louder than the Open Threshold, the channel is unmuted.
This comes in handy when you want to ensure complete silence on the mic channel or more strong control on the background noise.
You might not need to touch Attack/Hold/Release Time, but if the noise gate seems to be eating the beginnings of your sentences, then you may want to lower the Open Threshold or shorten the Attack Time.
- When the signal goes over Open Threshold, the channel will be gradually opened over Attack Time, like a fade-in.
- Hold Time determines how long the noise gate waits to close after the volume level drops beneath the Close Threshold.
- When the signal goes under Close Threshold and after Hold Time is passed, the channel will be gradually closed over Release Time, like a fade-out.
Compressor

| Problem | Voice is sometimes too loud, sometimes too quiet. |
|---|---|
| Function | Compress loud signals to make the overall signal constant. |
How to set up
- Check the range of your talking. Try talking in various ways and see where the peak meter stays.
- Decide where you want your range to be in the peak meter.
- Squeeze the range so it has the same length as the range you want.
- Drag up the range to the range you want.
This should be the most complex filter among the filters introduced here. But when you make enough audio test to get the current range of your voice and set the target range you want your voice to stay in, setting the compressor to your environment will be clear.
After figuring out which range you want your voice to stay in, you can first squeeze the signal, then make up for the volume loss caused by the squeezing.
- Any signal that goes over Threshold will be squeezed by the Ratio.
- The squeezed signals can be amplified back up by Output Gain. It will be added to the signal by the fixed amount.
There’s a setting for Attack/Release.
- When the signal reaches the Threshold, the squeezing will start gradually growing up to the Ratio, over Attack.
- When the signal goes under the Threshold, the squeezing will start gradually wearing off over Release.
Setting Example
Here’s an example case of setting up the compressor to make your voice constant and loud enough. The specific numbers can be various due to many reasons: how close your mouth is to your mic, how sensitive your mic is, how loud your desktop audio usually goes, and many others…
When you tried talking in various ways, sometimes the peak goes between -5 and -15, -15 and -25, and -30 and -35.
Your original voice range could be therefore between -5 and -35. You don’t need to be precise when defining the range. Just check the highest and lowest peak when you were talking.
Let’s say game audio is usually going around -20 and -30. Most of the cases you want your voice to be louder than game audio and other desktop sounds, so let’s set the target range to -10 and -20.

First, you want to squeeze the signals. Original range is 30dB wide (-5 ~ -35), and target range is 10dB wide (-10 ~ -20). Squeeze the original range by Ratio of 3:1 so it becomes 10dB wide.
With this change, the overall voice should be much quieter now. The changed range is between -25 and -35 now. You need to make up the volume loss, so let’s add Output Gain of 15dB. The range will be now -10 and -20, which is the target range.
Now, most of the time you speak to the mic, your voice will be in between -10 and -20. Unless you shout right into the mic, which will result going way over -10, because Compressor is not functionally ‘limiting’ the volume.
In that case, we could use Limiter.
By the way you can apply Compressor to Desktop Audio and other various capture device audio outputs to make them stay in a range most of the time!
Compressor for Desktop Audio could be set in a bit different way: you can set Threshold as ‘I hope the game usually doesn’t go louder than this’ and then set Ratio to control the peak of maximum expected volume.
If you want to make a hard limit for the desktop audio, Limiter can be helpful.

Limiter

| Problem | My voice is squashed at the max peak. |
|---|---|
| Function | Squeeze any signal under the level. |
How to set up Set the threshold to a value you hope your voice to never go louder.
This is basically a compressor, with differences being fast Attack Time and Ratio of ∞:1.
Any signal that goes over the threshold will be squeezed under it. But it’s not like cutting the exceeded parts with a scissor. It will be done smoothly, so viewers won’t hear annoying changes on the voice over the stream.
When the signal goes under the Threshold, the squeezing will start gradually wearing off over Release.
But there’s more! You can set it so you can change the threshold directly on the Peak Meter, instead of going to the filter window and selecting the Limiter.
Usually, Limiter should be the last filter for a channel - it puts the final nail to the ceiling of the peak! And volume control shown on the Peak Meter controls the volume of the final signal that comes from the last filter for the channel. If the volume control is set at 0.0 dB, the final signal will be kept as it is.
If you set the Limiter threshold to 0dB, the threshold becomes in sync with the volume control. Originally, a volume control will cut the exceeded signal, so the sound got squashed. But if it’s also the threshold of the Limiter, the signal will be squeezed in rather a smooth manner at that point, making it much better to listen.
And this is all the explanation for the five filters in OBS. It’s not a simple task to configure some or all of these filters for your environment. It’s not necessarily hard, but you will need to spend some time to actually test the audio - tweak a bit, make a short record (or test using the Audio Monitoring feature), listen to it, and rinse and repeat until you feel everything is alright.